BT747 Documentation
The documentation on this site is work in progress. If you select the 'Print Only Version' link below, you'll get all the documentation on one page. If you can read German, your best starting point is Dirk Haase's site.
Installation
The installation procedure is different according to the platform.
We will detail the procedure according the the type of GUI first. Some common problems are explained in a separate section.
Blackberry
BT747 should work on Mobile Phones that supports CLDC 1.1 / MIDP 2.0 and JSR-82 (bluetooth library). Take a look into the list of working reported phones. Please report if you have run it on a unlisted device, so we can add this to the list. Thanks. Download the current stable version from BT747-Sourceforge-page (select the file BT_J2ME_version.zip). Unzip the content and change to "dist". There you found the needed "BT_J2ME.cod". Install that file in the usual way on your Blackberry. Development versions have more functionality but are not considered stable enough to share with the larger public.
Common issues with the Serial Link Setup
It can be that BT747 does not include the serial drivers for your system. In that case, go to http://rxtx.qbang.org/ToyBox to look if there are binaries for your system. If there are, they couild be included in the BT747 distribution or made available through the web application. Contact the author of BT747 for that: through the contact form on http://www.bt747.org, through a feature request on sourceforge or through e-mail (see the application).
Linux
Apparently the Qstarz Nano 1300 requires another USB driver.
A nice 'how-to' is provided in the forum.
MacOSX
The process can be split in three big steps:
- Install the serial link driver
- Prepare to get the serial link to work (RxTx driver, only once)
- Install the application
In more detail, it goes like this:
- Usually the manufacturer did not care about MacOS, so you need to get the serial driver yourself from http://www.silabs.com (CP2102 VCP drivers).
You do not need that driver if you are using bluetooth.
- The trickiest part is the serial link driver with the application (RxTx). It requires the RxTx library to be compatible with the operating system and Java itself.
You will need to perform the following operations once. The operations make sure that a lock mechanism that is needed by RxTx can work for any user:
- go to Applications/Utilities
- run Terminal
- if you don't work as Admin, log in
- type login and press [return]
- type the name of the Admin and press [return], enter the password for Admin in next line and press [return]
- type sudo mkdir /var/lock and press [return]
- enter the password for Admin and press [return]
- type sudo chmod 777 /var/lock and press [return]
- type exit to log out
Most of the time this will make things work. You may still get trouble if you have a 64 bit operating system.
Indeed, at the time of writing, the only RxTx driver available for MacOS is a 32 bit version. You might be running a 64 bit operating system. Your 64 bit operating system can still run 32 bit programs, but when running a 64 bit program, all code it uses 'directly' must be 64 bit. As the RxTx driver does not come as a 64 bit version yet, running Java as a 64 bit version will not work. Quite franckly, there is not real reason to use the 64 bit version of Java, but you probably are if your operating system is 64 bit.
The solution is to install the 32 bit version of Java instead. I did not look where to find it, send a note to the application author if you know where it is. - Installing the application as indicated elsewhere
When using the Web Start system (running BT747 from the web) the above considerations are still valid. On top of that you also may need to give permission to the application to allow it to use the system's resources.
Windows
As on all platforms, the following steps are needed:
- Install the serial link driver (for USB, to be done only once on a computer)
- Install the application
- Get the serial link to work (RxTx driver)
In more detail, it goes like this:
- Usually the USB driver comes on a CD with your device. If not, you can probably get them from http://www.silabs.com (CP2102 VCP drivers)
- Installing the application as indicated elsewhere
- The trickiest part is the serial link driver with the application (RxTx). It requires the RxTx library to be compatible with the operating system and Java itself.
At the time of writing, the only RxTx driver available for windows is a 32 bit version. If you have Windows Vista, you might be running a 64 bit operating system. Your 64 bit operating system can still run 32 bit programs, but when running a 64 bit program, all code it uses 'directly' must be 64 bit. As the RxTx driver does not come as a 64 bit version yet, running Java as a 64 bit version will not work. Quite franckly, there is not real reason to use the 64 bit version of Java, but you probably are if your operating system is 64 bit.
The solution is to install the 32 bit version of Java instead. You can get it on sun's site (http://java.sun.com/javase/6/webnotes/install/system-configurations.html). You'll see that you have a choice between 32 bit and 64 bit.
When using the Web Start system (running BT747 from the web) the above considerations are still valid. On top of that you also may need to give permission to the application to allow it to use the system's resources.
Desktop GUI
 Installing the desktop version is easiest from the web. A reference to the installation links can be found on the Easy install page on http:/www.bt747.org . Installation from the web requires that you have 'Java Web Start' installed. This is already available on most Desktop systems. Further, you still need to have the low level drivers for the serial link (over USB or bluetooth). These were in principle on the CD that came with your GPS Logger if you have windows. For other systems, you need to get them from the Silabs site. Here is a direct link to the CP210x USB to UART Bridge Virtual COM Port (VCP) drivers. Well known Linux systems have the driver installed, on Windows and MacOSX you will need to install it.
Linux - ubuntu
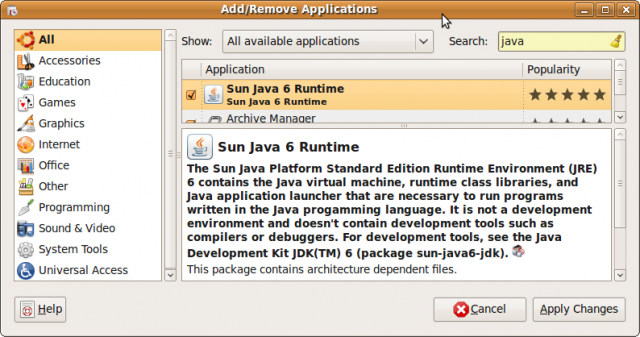
If Java not installed, go to Application / Add. Enter Java in Search. Now you have the choice between OpenJava and SunJava. BT747 works with both of them. A driver is not needed, its included in the Linux-kernel used by ubuntu. In the last step, you get BT747 to your comptuer. Go to the webinstall-page and try or install BT747. Or if you like to have all files on your local computer, go to the BT747-Sourceforge-page and download the current stable version. Unzip the content and run the desktop-version by clicking on „run_j2se.sh“ The correct port should be detected automaticaly by using "USB (for Linux, Mac)" - please connect and turn on the logger before you start BT747. For 64 bit, the same procedure should work because the startup script is improved and RXTX2.2pre binaries are joined.
MacOS X
First you have to download and install the usb-driver for the logger-device. You can use the universal one from the chip-manufacturer: SiLabs. The second step is a little bit complicated, but has to be done only once. First open the "Terminal" in "Application/Utilities". Then enter - as administrator - in that terminal (press return or enter after each line): sudo mkdir /var/lock sudo chmod 777 /var/lock The first line creates the directory "/var/lock" and the second makes it read/writeable for all users. In the future releases for bt747 (2.x) this step is not longer needed. In the last step, you get BT747 to your comptuer. Go to the webinstall-page and try or install BT747. Or if you like to have all files on your local computer, go to the BT747-Sourceforge-page and download the current stable version. Unzip the content and run the desktop-version by clicking on „bt747_macosX_j2se.command“. The correct port should be detected automaticaly by using "USB (for Linux, Mac)" - please connect and turn on the logger before you start BT747.
PDA
Go to the BT747-Sourceforge-page and download the current stable version. Unzip the content. Change to folder "dist", there you find the different distributions of BT747. Use
BT747.pdb und BT747.prc are for Palm PDAs, the appropriate CAB file is for your Windows Mobile PDA. Install them using the software provided by the manufacturer of the PDA (or any other other method that you are used to).
Also you need SuperWaba. Download them from Sourceforge. There are again different files available, select that one that you need for your PDA and install this the same way as above.
To run BT747 just click in the icon. SuperWaba will automaticaly start in the background. If you prefer another language click on the titlebar and select "Lang", choose the language you like.
Windows
You need to install the Windows device driver first if that is not done yet. Use the CD that come with the logger-device or visit the web-pages:
- Holux
- Qstarz
- Transystems (nothing available there (05/2009)
- universal driver, sucessful tested with Qstarz and Transystems devices
Did you already install Java (JRE, Java Runtime Environment)? Most users do, but if not so, go to Sun microsystems (file: JRE 6 update 13 (05/2009)). In the last step, you get BT747 to your comptuer. Go to the webinstall-page and try or install BT747. Or if you like to have all files on your local computer, go to the BT747-Sourceforge-page and download the current stable version. Unzip the content and run the desktop-version by clicking on „run_j2se.bat“ unter XP or "run_j2se64.bat" under the 64bit version of XP/Vista. To connect the device, select the correct COM-port. If you don't know them, go to the Device Manager and look for the COM-port with "CP210x in the description".
mobile phone
BT747 should work on mobile phones that supports CLDC 1.1 / MIDP 2.0 and JSR-82. Take a look into the list with as working reported phones. Please report if you have run it on a unlisted device, so we can add this to the list. Thanks. Go to the BT747-Sourceforge-page and download the current stable version (select the file BT_J2ME_version.zip). Unzip the content and change to "dist". There you found the needed files: "BT_J2ME.jad" and "BT_J2ME.jar". Install the files over the usally way on your mobile phone. Or put them on a memory card, insert them in you mobile phone and run "BT_J2ME.jad" there to start the installation.
Introduction
BT747 is an application to control GPS Data Loggers based on the MTK Chipset. GPS Devices that are not Data Loggers, can benefit from part of the functionality.
BT747 was orignally designed for handheld devices.
Today it has four different interfaces:
- Desktop GUI, works on Windows, MacOSX, Linux;
- PDA GUI, works on Palm, PocketPC, Windows, MacOSX, Linux;
- Mobile Phone GUI, works on Java Enabled Phones (with JSR82 for bluetooth and JSR75 for file access);
- Command line operation, works on Windows, MacOSX and Linux.
All versions use a common core code.
Function Overview
- Use the SW on your PDA (and some phones) - No need to have your PC with you to change settings or know the device status;
- Download the log in raw format - the raw format is saved and can be appended to later on (fine grained incremental download) or converted at a later time;
- Archive the logs. You can keep the original 'bin' files and convert them at any later time. It is not required to be connected to the device to convert. You can name the file after the date or the trip that is logged in it.
- Convert the log to CSV, KML, GPX, NMEA, Google Maps (single HTML file), CompeGPS (TRK), or PLT (OziExplorer) format (CSV is improved over the original application);
- Define the name and location of output (input) files ;
- Get one output file per day in the log file;
- Automatically seperate tracks.
- Subtract the difference between the MSL (geoid) and the WGS84 from the logged height. This difference is added to the height when it is logged in the device. That way the height is matched to what Google Maps expect and to what the user expects.
- Filter items written to these formats by:
- date (start/end date);
- log reason (time, speed, distance, button, and application specific);
- fix type (no fix, sps, dgps, estimate, ...)Change the logging reason parameters (time, speed, distance). To change, check the tick box and then push SET;
- record number, speed, distans, PDOP, HDOP, VDOP, NSAT (=Advanced).
- Change the log format (without erasing the log on the device);
- Set 5Hz logging (set Time=0.2 s and fix = 200 ms) or the button on the 'Easy' tab;
- Log positions from within the application (on the device) using extra log reasons.
- Start/Stop the log;
- Set some special settings (not available in the PC application delivered with the device): DGPS mode, test satellite, fix frequency (e.g., 5Hz setting)
- Avoid the bugs of the original application (V2.2):
- Incomplete (incorrect) log download resulting in not being able to get all the log points;
- Errors in HDOP value interpretation (1.09 is written as 1.9 by the original application);
- Incorrect date given in the NMEA format.
Desktop application
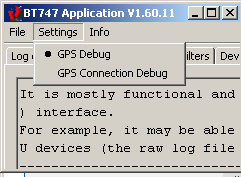
Title Menu
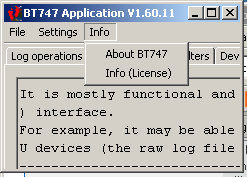
| Settings Menu | |
|---|---|
| GPS Debug: | Provide a minimum set of debug information on the console. Most of it is also shown in the Info Panel. This option is activated by default in the early versions of the Desktop version of BT747. |
| GPS Connection Debug: | Provide extra debug information. This activates logging all the communication on the serial link in a raw format. The file is called 'gpsRawDebug.txt' and should be located in the output directory that was specified at the time it was enabled. |
| Info Menu S |
|
| About BT747: | Shows information regarding the application version and build identification. The build identification is unique regardless of the version number. You'll also find the author's email address there and the translator of the applicaitions text. |
| Info (LICENSE): | Other information regarding the application - mainly a disclaimer and an indication of the license. |
Log Operations Panel
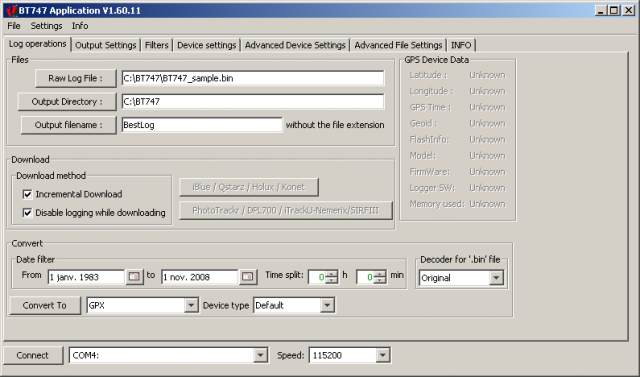
| Connect Shown on all screens! |
|
|---|---|
| Connect button: | Click to connect to the indicated serial port. Once connected, this button will change into 'Disconnect' and can be used to stop the connection to the device. |
| Port name: | Select the system port that interfaces with the GPS device. It is possible to type the port name directly - it does not have to be in the list. "USB" will attempt to locate the USB port automatically on Linux and MacOSX systems. "BLUETOOTH" will try to locate the bluetooth port automatically on MacOSX systems. |
| Speed: | The speed to use for the serial connection. Most of the time 115200 baud will be the correct speed, in some cases 38400 baud is needed (this is the case for the Holux M-241). If the speed is not in the list, you can enter the speed directly. |
| Files | |
| Raw Log File: |
The file to which the data is saved when downloading, or read when converting. The extension should be '.bin', except for Phototrackr and similar devices where it should be '.sr'. it is important that the extension is '.bin' for raw log formats! |
| Output Directory: | Location where the files created during conversion will be written. |
| Output filename: |
The basename of the files that will be written. This does not include the filename extension. The path is relative to the output directory. The basename will be post-fixed with date and time information as well as the appropriate file extension for the chosen output format. It is possible to have a customised based name by using '%*' tokens. Please see http://php.net/manual/en/function.date.php for details - most of the 'php' formatting options are available. As soon as you specify a '%' token in your filename, BT747 will no longer do its magic and you assume the entire responsibility that the resulting filename is unique (for instance, if you have more than one file for the same day, make sure that you include the hour and minutes - not just the day). |
| Download | |
| Incremental Download: | If data was previously downloaded to the device in the file specified as Raw Log File and the data in the Raw Log Files looks the same as the one currently present in the Device, only new data will be downloaded. This will speed up the download substantially. If the data is different, the user will be requested to confirm overwriting the data. |
| Disable logging while downloading: | Normally the device will continue logging regardless of wheter a download is going on. To avoid filling the memory while you are downloading, tick this option and the device will be instructed to stop logging. At the end of the download the logging will be activated again if it was active at the start of the download. |
| iBlue / Qstarz / Holux / Konet: | Download from this type of device. This is valid in most cases. |
| PhotoTrackr / ...: | Download from one of these devices. The download protocol and format is different. This is currently experimental as no user actually confirmed correct operation. |
| Convert | |
| From ... To ...: | The date range for the records to be converted. This is a filter, but it something the user may want to configure every time. Therefore it is located in the main panel. |
| Time split: | This time will be used as the start time on the indicated 'from' day (taking into account the UTC offset in the 'Output Settings' panel and as the end time on the day following the indicated 'end day'. For instance, if you filter from September 2nd to November 1st, and the time is 2h30min, the chosen records will be between September 2nd at 2h30 and November 2nd at 2h30. |
| Decoder for bin file: | A user developed an alternative decoder for raw binary files. That one is still buggy but kept availalbe for testing, so you'ld better choose the 'Original'. |
| GPS Device Data Live position data from the GPS device. |
|
| Latitude: | Latitude of the current position. |
| Longitude: | Longitude of the current position. |
| GPS Time: | GPS time (UTC reference) returned by the device. |
| Geoid: | The offset of the Geoid (or Mean Sea Level) to the WGS84 elipsoid. Both are model of the earth 'surface'. In its NMEA packets, the GPS provides the Geoid offset versus the WGS84 and also the altitude of the position versus the Geoid. The GPS device calculates the Geoid itself - the actual reference is the WGS84. In the log the 'height' or 'altitude' that is logged is the WGS84. BT747 calculates the Geoid for itself, and that value is indicated here too to see if this corresponds with the device's calculation (which is a bit less precise). |
| Flashinfo: | The flash ID (a hexadecimal value that can be used to identify the flash type) and an interpretation of it: manufacturer and size in bytes (not bits). When the manufacturer reports 16Mb, BT747 reports 2MB. The first value is Megabits, the latter one Megabytes! |
| Model: | Shows the model ID number as returned by the device. In parentheses is the guessed device name. |
| Firmware: | Firmware version information as returned by the device. Some devices return very long information and then this information is split on two lines. If the first line ends with '...', use the tooltip text to see the entire string. |
| Memory used: | The number of bytes filled in the log memory. In parentheses the percentage of memory filled. |
User/External Tool Output
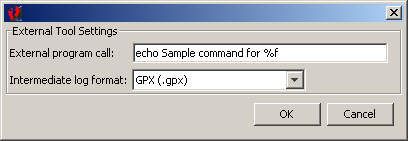 User/External tool popup.
After clicking 'User', you can call upon an external tool do do specific operations with the position data.
To tag using 'exiftool', you could set the file format to 'GPX' and enter the following for the external tool call:
/directorytoexiftool/exiftool -geotag %f /directoryofmypictures/
For the GPS log ormat, Exiftool supports GPX, NMEA RMC/GGA/GLL and KML (as well as a few other formats not supported by BT747), therefore GPX is a good choice.
For the images, Exiftool support a lot of formats, including raw formats like .NEF.
Output Settings Panel
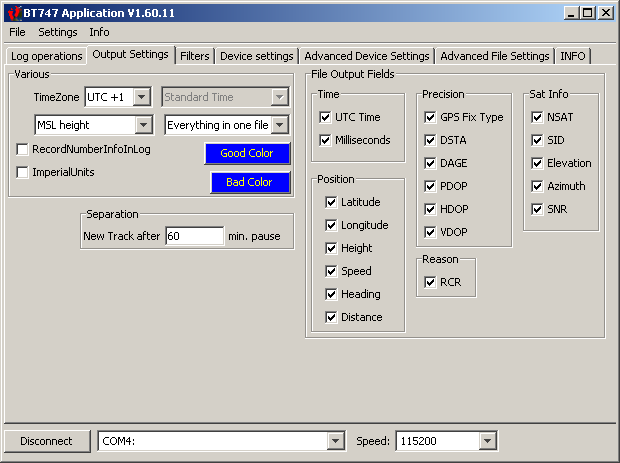
| Various | |
|---|---|
| TimeZone: | The time offset that is to be applied to the time in the source log file. If the TimeZone is set to UTC+1 and the time in the input file is 12:35, then the time in the output file will be 13:35. There are some execeptions which can be controlled in the Advanced File Settings. |
| Keep WGS84 height MSL Height: |
MSL stands for 'Mean Sea Level'. The heights (altitudes) in the Logger are recorded using a reference called 'WGS84'. This is a reference supposed to be close the Earth's "surface", but it is not perfect. As human beings we are used to refer to altitudes by taking he Sea Level as a reference. By setting this option to 'MSL Height', BT747 will apply a correction to the height found in the input file. The correction corresponds to the difference between the modeled Mean Sea Level and the WGS84 Elipsoid. |
| Record Number Info in Log: | When active, the positions are numbered and that number is written into the output file. by de-activating this option, you can make the output files smaller. |
| Imperial Units: | The English had their proper units and they still use them! Clicking this option will make metrics appear as inches, miles, miles per hour, etc . |
| Good Color: | The color that is used in the HTML and KML output formats to indicate the track segments that correspond to valid positions. |
| Bad Color: | The color that is used to indicate segments with positions that were not selected. Example: when going through a tunnel, the device would log some invalid positions - invalid being no fix, PDOP to high, ... (according to the filter settings). That part would be shown in the 'Bad Color'. |
| File Output Fields and Items A further restriction of the information written to the output file. |
|
| You might log more fields than you want to find in the final output file. For example, you might choose to log HDOP and NSATs to be able to filter imprecise positions. If you do not want that information in your KML output file, uncheck them here. These values are still used for filtering, but not written to the KML file (works for other formats as well). | |
| Most fields: | Same significance as the log format explained elsewhere. |
| Add Track Point Info: | Adds the same information to track points as to way points. This will make the file bigger, but all information will be in it. If unselected, only way points have full information. |
| Add Track Point Name: | Give a name to eacht trackpoint. In Google Earth this will show a label for each track point when the track point list is opened. This will help locate the trackpoint you want to show. If unselected, this list will have empty labels. If Both 'Track Point Info' and 'Track Point Name' are disabled, individual track points will not be logged to KML output. This makes that output a lot smaller. |
| Separation | |
| New Track After ...: | Indicates the time separation required between two successive position to start a new track. For example, if this value is set to '60 min' then if your device did not log any position for 60 minutes, the next position will be the start of a new track. New tracks can result in separate files or in separate sections in certain formats (like a KML file). |
| Element: | Element description. |
Filters Panel
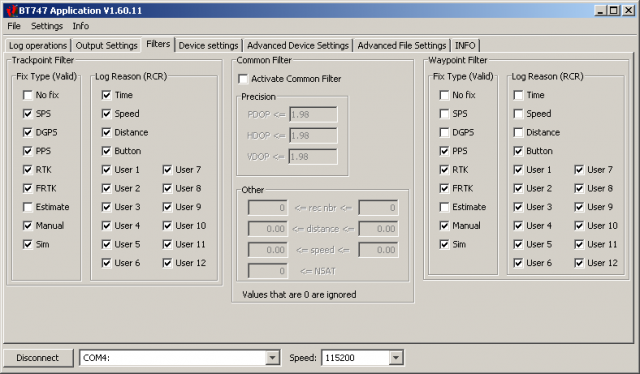
| Trackpoint Filter Selects the positions that build up the track |
|
|---|---|
| Fix type | |
| No Fix: | The device logged a position but did not have a fix. Usually unselected. |
| SPS: | Standard Positioning Service. The accuracy of the signal may be degraded to 100 m via Selective Availability. S.A. was turned OFF on May 1st, 2000. |
| DGPS: | Differential GPS. Correction of the GPS coordinates by applying an offset identified by fixed position receivers. Supposed to be more precise when differential data is used. |
| PPS: | Precise Positioning Service. "Military" signal with high accuracy (< 10 m) - encryption only known to military |
| RTK: | Real Time Kinematic. Sat system used in RTK mode with fixed integers |
| FRTK: | Float Real Time Kinematic. Sat system used in RTK mode with floating integers |
| Estimate: | The position is an estimation by the device. The position is usually not very precise. Also called 'dead reckoning' |
| Manual: | Manual entry of the position. No known usage in the existing devices. |
| Sim: | Simulator value. No known usage in existing devices. |
| Log Reason Why the position was recorded. |
|
| Time: | The time condition was reached. The previous position was logged more than the programmed number of seconds earlier. |
| Speed: | The speed condition was reached. The speed was higher than the limit. |
| Distance: | The distance conditions was reached. The measured distance was over the limit. This is not the direct line distance to the previous position! |
| Button: | The position was logged because the user requested so by pressing the device button. |
| User *: | Extra waypoint types can be logged through an application (like BT747). This list will be shortened later on. Currently selects the bit in the user field that has to be active. |
| Common Filter Filter specification used for both waypoints and trackpoints. |
|
| Activate Common Filter | When not active, the common filter is not used (and the menu items are grayed out. |
| *DOP: | HDOP, VDOP and PDOP are related to the position accuracy. The smaller the value, the more accurate the position. It is recommended to log the HDOP value with each position and define the limit as 1.98. HDOP: Horizontal precision VDOP: Vertical precision. PDOP: Positional precision. |
| rec nbr: | Limits for the record number. This can help you to select only a part of the log. |
| distance: | Limits for the distance field in a position record. |
| speed: | Limits for the speed logged with a position. |
| NSAT: | Minimum number of satelites in use needed. Also a method to select only precise positions (select at least 4 or 5 satellites) |
| Waypoint Filter Select positions that will be used as waypoints - they are usually shown as icons with detailed position information. The meaning of the filter settings is the same as for the trackpoint filter. |
|
Device Settings Panel
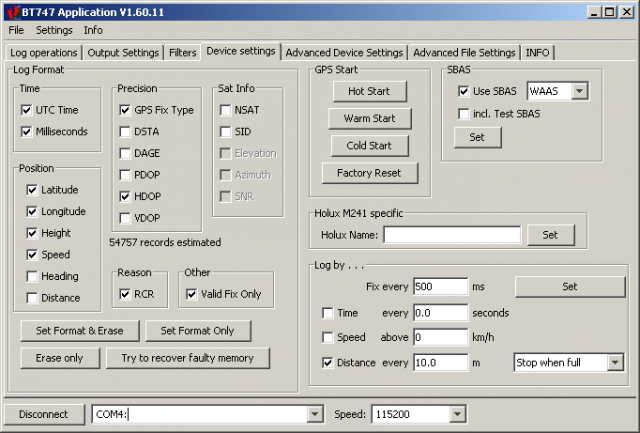
| Log Format Defines the fields that you want the logger to store for the positions that meet the log conditions. You can log more values than you actually need and use BT747 to extract only those values that you want. This is particularly usefull to filter out invalid positions : you can log the HDOP value to get an idea on position accuracy and then set a limit on HDOP to select only positions that are precise enough without writing the HDOP value to the output file. |
|
|---|---|
| Time: | The time information is logged through the UTC field and the Milliseconds field. The UTC field corresponds to the date and time in second precision. You can achieve milliseconds precision through the millisecond field. Even though you can log the milliseconds field without logging the UTC field, that normally does not make a lot of sense since it will be impossible to know how many seconds your positions are apart. |
| Position: | The latitude field and the longitude field will need to be selected if you want to know your 2D position at all on the globe. This is normally what you got your logger for. The height field field will allow you to know what altitude you were at. The logger actually logs the WGS84 altitude expressed in meters which is a very different value from the one you use in day-to-day life: the mean sea level (MSL) altitude. BT747 will help you to get the MSL value from the logged value (through the conversion options). The speed is logged in km/h and is presumably determined through a doppler measurement in the logger. It obviously needs to be logged by setting the speed field and it represents the instantaneous speed that you had at the logged position. The heading field enables logging the direction that you were moving in. When not moving this direction is pretty meaningless. The heading is not determined magnetically but again persumably determined through doppler effect observation. Finally, distance will indicate the measured track distance of the new position with the previously logged position. In between two logged positions, the device will have performed other position measurements and these positions are taken into account too for the distance calculation. The distance value becomes pretty meaningless if intermediate positions were invalid. It is generally valid your device has a permanent fix. |
| Precision
The precision fields will help you determine the accuracy of the logged position. One other field can help you determine the precision too, but it is categorized elsewhere: the NSAT field. Indeed: the number of satellites in use also gives a good idea about precision |
|
| GPS Fix Type: | The GPX Fix Type field or in some softwares the VALID field indicates the kind of fix that was achieved. This includes 'no fix' or invalid, 2D fix, 3D fix and DGPS fix. Other types exist as well but should not be observed by most mortels. You do not really need this field if you also log at least one of the HDOP, VDOP or PDOP fields. |
| HDOP, VDOP, PDOP: | These three fields respectively log the horizontal, vertical and positional (read 3D) precision indicators. Their value turns to 99.99 if the position is invalid and you can use them as a filter too in BT747. Personally I use HDOP because the vertical precision does not interest me that much. You can consider the PDOP value to be some kind of mix between the HDOP and VDOP value. My limit in the BT747 filter is set to 1.98 |
| DSTA, DAGE: | The DSTA field and the DAGE field provide information regarding the DGPS satellite that is supposed to provide differential correction data to compute a more precise position from the measured position. The DSTA field will provide the satellite number providing the data and the DAGE field indicates how old that data is. These two fields could also be be labeled as satellite data but as they are related to precision, they were added to the precision group. |
| Reason: | The RCR field stand for ReCord Reason (I suppose) and indicates why the position was logged. This is intimitally related to the log conditions that you defined for the device. If the set time has elapsed, the RCR field will be T (for Time). If the minimum speed was exceeded the field will be 'S'. The distance condition being met will result in 'D' and finally if you pressed the devices Button, it will be be. In practice several conditions may be met at the same time and you get a mixture of T, S, D and B
BT747 also allows you to log for other reasons through the application. These reasons are also logged in the RCR field and take other forms in the output formats. |
| Other: | The Valid Fix Only is not actually a field, but this configuration is also set through the log format. This is only taken into account on some devices and it is actually a log condition. When activated, the compatible loggers will only log positions for which the valid field is something else than 'No Fix'. It will result in a reduced consumption of memory. |
| GPS Start | |
| Hot start: | Reuses all recently known information. |
| Warm start: | Keep almanac information, but looks for satellites again. |
| Cold start: | Forgets about alamnac information and looks for satellites again too. |
| Factory reset: | Will reset some more values internally to the device and the proceed with a cold start. The effect of this is not very documented, so you'll get some extra warning messages to confirm that you really want to do this. |
| Erasing and setting the log format | |
| Set format and erase: | Sets the format and then erases the logger memory. This is the same operation as the one done when you change the log format with the original application and ensures compatibility with it (except for Holux where the original application does (or did) not support other log formats). |
| Set Format Only: | Will change the log format, but not erase the memory. The original applications will no longer be capable of treating your log. |
| Erase Only: | Despite of your manual changes to the log format, the log format currently set in the device will not be changed and the log will simply be erased. |
| Try to recover faulty memory: | This is a specific procedure that will erase the logger's memory and 'recover' memory blocks that were labeled as faulty. You can compare this to bad blocks on a hard disk. When the OS discovers one of the HD blocks gives a bad checksum or some other bad operation, the block will be labeled as bad and no longer be used. A hard disk format will usually reset this condition.
Flash memory is also organised in blocks. When your logger detects that one of these blocks did not respond well, it will be labeled as bad and no longer be used. This reduces your effectively available memory. This bad block condition is stored in some other non-volatile memory of your logger. Bad blocks can be the result of a low battery value resulting in a bad write (or read?) and do not represent a permanent condition. But sometimes these blocks may really be bad This procedure will reset the bad block condition to valid and erase all the blocks of your memory. In most cases this will help. |
| Log by ... | |
| Fix every: |
This is the time between GPS fixes. Each of the conditions below (time, speed, distance) is evaluated independently on every fix (valid fixes only if you have 'Valid Only' checked). In other word, the time, speed and distance conditions are OR'ed - only one of these conditions has to be met for the position. And, for instance, the 'RCR' (ReCord Reason) field will be represented as TD if both the Time and Distance condition were met. |
| Time every: |
Define the time logging condition. To achieve 5Hz logging, you have to set 'Fix every' to 200ms and this field ('time every') to 0.2s . When the value is 0, the condition is disabled. |
| Speed above: |
Define the speed logging condition. When speed is higher than the indicated speed, the position will be recorded. As with 'Time', 5Hz logging is possible and will be active as long as the actual speed exceeds the condition and the 'Fix period' is set to 200 ms. |
| Distance every: |
Define the distance logging condition. When the travelled distance since the previously logged position is higher than the programmed distance limit, the new position will be logged. As with 'Time' and 'Speed', 5Hz logging is possible and will be active as long as you move fast enough to exceed the distance every 200ms. So if you require distance to be 1m, then you need to move faster than 5m/s to have a position logged every 200ms. A distance condition of 1 meter @ 5Hz corresponds to 5*3600m/hour = 18km/h . Setting the distance condition (in stead of the other conditions) is pretty much preferable because:
In addition you could add a time condition which ensures you that you get a position when you are not moving, for instance, every 5 minutes (300 seconds). That time condition of 300s would require about 288 positions each day when you are not moving which is a reasonable 'overhead'. |
| ... when full: | Element description. |
| Element: | Element description. |
| Holux M241 specific | |
| Holux name: | Element description. |
| Element: | Element description. |
| SBAS | |
| Use SBAS: | Element description. |
| Incl. test SBAS: | Element description. |
Advanced Device Settings Panel
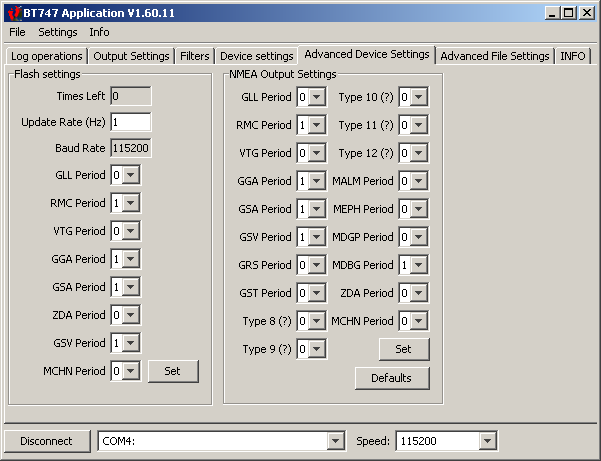
| Section Section Description |
|
|---|---|
| Element: | Element description. |
| Element: | Element description. |
| Section Section Description |
|
| Element: | Element description. |
| Element: | Element description. |
Advance File Settings Panel
 BT747 1.60.11 Advanced File
| Section Section Description |
|
|---|---|
| Element: | Element description. |
| Element: | Element description. |
| Section Section Description |
|
| Element: | Element description. |
| Element: | Element description. |
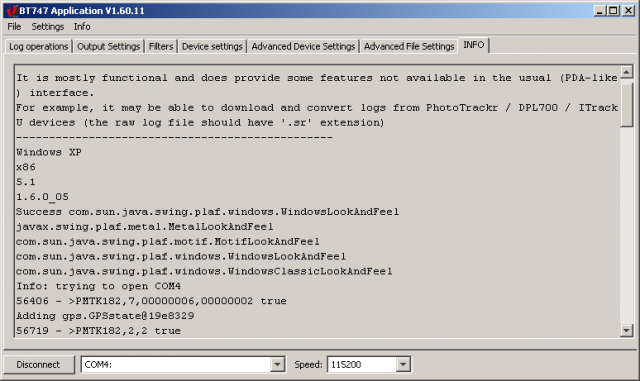
Info Panel
| Section Section Description |
|
|---|---|
| Element: | Element description. |
| Element: | Element description. |
| Section Section Description |
|
| Element: | Element description. |
| Element: | Element description. |
AGPS Panel
The AGPS Panel (currently in the dev version) allows you to upload AGPS data to the device.
For the MTKII devices, this is called 'EPO' data which means 'Extended Prediction Orbit'. It is a format specific for the MTKII chipset.
As authorisation is currently lacking to integrate server location and login/password to connect to the FTP server is missing, you need to find that information for yourself. Your firewall can tell you what an application tries to connect to for instance.
Files to tag
Map
Track
Waypoints
PDA Application
Documentation is available as PDF on the sourceforge site.
For what it is worth, on Windows Mobile (PPC, ...) platforms, you can use a Port Splitter. A free one is here. It may solve some issues in some cases. A port splitter allows you to share a port accross applications
German users may want to read on
http://www.haased.de/gps_ge/bt747_installation_pda.html
or
http://www.die-ritters.de/blog/holux-m-241-und-bt-747.sturkopf .
J2ME Application (Mobile Phone)
Location Server Settings
The J2ME application can upload the current position to a server on the web. For information on the web server set up, see /node/200. This is a very short note on how to set it up. The first version this stuff is available in is BT_J2ME 0.3.28
| To set up BT747 on your phone for position serving, first find "Position" in the main menu: | 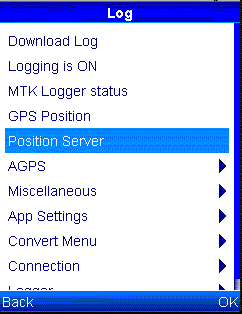 Position menu in main menu Position menu in main menu |
|
Selecting that will another screen initially telling you that no updating is done. However, the menu buttons (bottom) will allow you to select 'Menu' to show this the screen on the right. General will allow you to enable position serving and set the update rate (by default every 300 seconds, which is every 5 minutes). The last item 'Authentication' allows you to enter a user name and password if your server requires it (a '.htaccess' file can restrict access to the files showing where you are). The middle item, 'Server' is a little bit trickier and the configuration is show just below. |
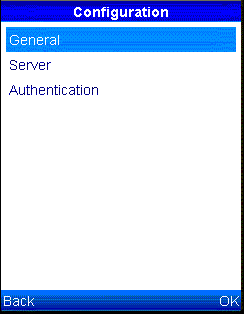 BT J2ME Location Configuration Menu BT J2ME Location Configuration Menu |
| The hostname is the symbolic name or the IP address of the server that you want to talk to. Here it is a virtual hostname 'mylieu.bt747.org'. The port number is important too. This can be about anything, but here it is 80, the default http port. The last line is the actual path to the 'page' on the server accepting the position parameters. Here it is 'setUserPosition.php' as proposed by default in the mylieu project discussed on the page referred to above, but it could be 'private/setUserPosition.php' if you moved that to a subdirectory called private. Once this is set up correctly, and you have a valid data connection on your phone, the applilcation should start sharing the position with the server. In this development version, it will show a '!' (exclamation mark) when it did not succeed in connecting to the server and a '.' (dot) when it did succeed. |  BT J2ME Location Server Configuration BT J2ME Location Server Configuration |
Good luck.
Command line
The command line interface allows you to script BT747 operations.
Not all BT747 functionality is implemented yet. The first interface definition was based on mtkbabel, the code is entirely different!
There are only 'a few' customers for this, so functionality will be added as requested and acccording to other priorities.
AGPS
AGPS (assisted GPS) is a system that helps GPS devices in getting a FIX situation faster.
In a few words the EPO file contains "hints" that lead the device to find satellites faster.
To use the AGPS feature of your device you have to keep those "hints" updated.
This is useful in poor signal conditions, like when tall buildings or trees make the signal weak.
The new AGPS upload feature is available even in the command line version.
From the usage:
--agps Upload APGS data using the default URL
(or the provided url when available).
--agps-clear Clears the AGPS data in the device
(done before the upload).
--agps-url Specify the URL (file://, ftp://, http://)
to the AGPS (EPO) data.
The basename of this file is usually
MTK7d.EPO, MTK3d.EPO, MTK8d.EPO or
MTK14.EPO
Implies agps option.
If you use command line probably you are using it in some sort of BAT script.
This is my experience in mirroring EPO files to get a faster download (and my troubles...)
When uploading EPO files to many devices it could be faster to mirror an EPO file you got somewere, and then upload a local file to avoid a network transfer everytime you send data to the device.
But the EPO file has no checksum informations, so be careful you do not alter the file during the transfer.
Linux example:
cd /home/locale1/agpsdata ; wget ftp://username:password@ip.ad.dre.ss/path/to/file.EPO -O file.EPO
It works without damaging your file.
Win example:
we call ftp with a script file:
c:\windows\system32\ftp -s:c:\mailtrack_app\ftp.cmd
content of ftp.cmd:
open ip.ad.dre.ss
username
password
binary
get file.EPO C:\your\path\file.EPO
quit
Notice the "binary" command:
without this the file get corrupted, and you can notice this when - with the GUI - you see the expiration date of the EPO file very far in the future.
Overview
The next table has to be updated. Look at the help provided on the command line for up-to-date information.
| Option | Description |
|---|---|
| -R | Recover from disabled log: erase data and reset recording criteria |
| --UTC <Integer: UTCoffset> | Define UTC offset to apply to output file |
| -a | Read all the log memory (overlapped data) |
| -b <filename.bin> | Do not read device, read a previously saved file.The file type is selected according to the filename extension. Recognized file extensions are .csv, .trl,.nmea, .nme, .nma, .txt, .log, .sr . |
| --badcolor <HEXCOLOR> | Color to use for 'bad part' in tracks (HEX RGB value), ex 00FFFF |
| --color <HEXCOLOR> | Color to use for tracks (HEX RGB value, ex 00FF00) |
| -d <Integer: DEBUG_LEVEL> | Debug level: 0..2 |
| --device <DEVICE> | Make sure the raw bin file is correctly interpreted (DEFAULT, HOLUX). |
| --download-method FULL|SMART|REPORTED | Select the download method. FULL = All the memory, SMART=According to previous download, REPORTED=Ignores overwrite setting and download reported used memory. |
| -f <filename> | Base name for saved files (.bin and other) |
| -h | Displays help |
| --height-to-msl | Correct WGS84 height (elevation) to MSL (Mean Sea Level) |
| -l <(on|off)> | Turn logging ON/OFF |
| -m <(stop|overlap)> | Set STOP/OVERLAP recording method on memory full |
| -o <log_format> | Enable or disable log fields (FIELD1,- FIELD2,...), available fields: UTC, VALID,LATITUDE,LONGITUDE,HEIGHT, SPEED,HEADING,DSTA,DAGE,PDOP,HDOP, VDOP,NSAT,SID,ELEVATION,AZIMUTH,SNR, RCR,MILLISECOND,DISTANCE,VALID_ONLY |
| --outtype <OUTPUTTYPE> | Create a gpx file of type NMEA, GPX, GMAP, KML, KMZ, CSV, PLT, TRK. More than one format can be specified when separated with ',' |
| -p <port> | Communication port, default: /dev/ttyUSB0 |
| -r <Integer: time:distance:speed> | Set logging criteria (zero to disable) |
| -s <Integer: speed> | Serial port speed, default 115200 baud |
| --splittype <SPLITTYPE> | The way to split the input data: NOSPLIT, DAY or TRACK |
| -t | Create a gpx file with tracks |
| --template-taggedfilename FORMAT | Specify the template for the tagged filename. Default FORMAT is "%p\%f_tagged%e".
%p is replaced by the directory of the original file. %e is replaced by the extension of the original file. %f is replaced with the base of the original file. So the default will convert a file "BT747\org.jpg" to "BT747\org_tagged". |
| --timesplit <Integer: MINUTES> | Time separation in minutes needed for track segment or track separation. |
| --trkptinfo | Add record information for each trackpoint. |
| --trkptname | Give each trackpoint a name (based on time) |
| -v | Print BT747 version and exit |
| -w | Create a gpx file with waypoints |
Frequently Asked Questions (FAQ)
My logger's memory is only partially filled, but BT747 downloads the full memory. What is wrong?
Chances are that at the time of erasure of your logger's memory, the logger was in 'Log Overwrite' mode. This information is stored in the header of the log. If that is the case, then BT747 does not know how much information is in the log exactly. The value returned by the logger reflects only the current memory write position. If the memory is being overwritten, this is not indicated by the logger. Therefore, BT747 downloads the entire log to make sure that no data gets lost. In some future version, BT747 will become smarter and check if there is usefull data past the current write pointer. This is currently not the case.
I can see the tracks in Google Earth, but not all the trackpoints or waypoints are shown. Am I doing something wrong?
Actually, Google Earth is doing something wrong ...  The timeline just above is the culpritt. By default GE will not select the entire timeline but for some reason only part of it. The missing trackpoints or waypoints are just hidden by the unselected part of it. It can be fun though if you click on the arrow just to the right of the timeline: the selected trackpoints change over time and emulate movement.
When I show the tracks in Google Earth, they disappear when I zoom. Is this a bug?
No, this is not a bug. The tracks written by BT747 usually have the altitude information, and the default option for Google Earth to show these tracks is set to 'Absolute'. To see this setting, you can open the properties of a track (right click, then properties), go to the 'Altitude' tab where you can see a pull down box showing 'Altitude'. You can change that property to 'Clamped to ground'. Once confirmed, you'll be able to see the entire track. The other method to see the track (in most cases, except when you're close to the sea), is to disable the 'Terrain' layer in Google Earth. When activated the earth image will be shown at actual terrain altitude, in the other case they are projected at the mean sea level.
BT747 connects to my Holux M-241, but downloading "stalls".
If you do not get the current position either, then it is likely that you forgot to set the baud rate to 38400.
BT747 says 'No output files were created' - I can't get any file from my log.
Have a look at Typical Filter Settings - Solving 'No positions' selected by BT747 issues .
I can't connect to my device.
There are several forum entries regarding connecting to devices.
If you are on a linux system, check that you do not have 'gpsd' running. 'gpsd' connects to the GPS automatically and seems to be installed by default on some recent systems like Fedora 14. Once connected, the port is monopolized by 'gpsd'.
How should I report bugs or feature requests.
In practice, any type of reporting will do (forum, mail), but I you prefer a formal follow up, you can use the bug tracking system at sourceforge and the feature request feature at the same place.
GPS Tracking
It is possible to do real-time GPS tracking using BT747. This is different from GPS Logging which can be considered as Deferrred GPS Tracking as you can get the track at a later time. Working with differential tracks is the main function of BT747, but live tracking is provided in the Desktop version and the Mobile Phone version (J2ME).
To do so, you will need to set up a web service such as the myLieu project (German) (possibly also see Trac (English)).
The myLieu project has been improved and you can get the current version of BT747's myLieu as WebContent.tar.gz . You can see that code at work on http://mylieu.bt747.org and http://mylieu.bt747.org/viewer.php. When you setup your own server, make sure to create a config.php file where you set the google map key (example for bt747.org):
<?php $GMAP_KEY="ABQIAAAADFJoSTzQCLixbHnZMg9AvxQ4IMxX_BgFv85tBKXNitpaLQ9wNBQddvamzC31--esGSYRR2SZLPIc6w"; ?>
Alternatively, you can use OpenLayers which you can see in action on http://mylieu.bt747.org/index_openlayer.php and http://mylieu.bt747.org/viewer_openlayer.php.
You can make a trial yourself using the mylieu.bt747.org site by configuring BT747 like indicated in the table below. If you try these parameters, be aware that your position(s) will be memorised on the server - no guarantee is given regarding erasing them.
| Host | mylieu.bt747.org |
|---|---|
| Port number | 80 |
| (File ) path | setUserPosition.php |
| Update period | As you like it. Number of seconds |
| User Name | As you like it. |
| Password | Not used on mylieu.bt747.org (required if you restrict your access using .htaccess). |
| Serve Locations Active (or GPS Tracking active) |
The box must be ticked to share your position on the web. |
That sets up BT747 to perform HTTP GET requests.
The data transferred in the GET paramters are listed here:
| HTTP GET Parameters sent by BT747 | ||
|---|---|---|
| latitude: | double (text) | The latitude value of the current position |
| longitude: | double (text) | The longitude value of the current position. |
| position: | double,double (text) | Latitude and longitude in one parameter (example: position=50.1,3.1231) |
| user: | text | The user name |
| speed: | float (text) | The speed measured a the current position in km/h |
| dir: | float (text) | Heading (direction) in degrees. |
| alt: | float (text) | Altitude above Mean Sea Level in meters for the current position (not including geoid). |
| hdop: | float (text) | HDOP value |
| numsat: | float (text) | Number of satelites used for the position. |
| btaddr: | XX:XX:XX:XX:XX:XX (hexadecimal text) | Bluetooth address of device. Can be used to distinguish between different devices. |
Device specific instructions
Some specific configuration is required for specific devices. These sections are intended to group as much information as possible based on feedback of users.
Holux M-1200e
Characteristics
| FCC ID | |
| Model (as reported in BT747) | 0000 (iBlue 737/Qstarz810) |
| Firmware | AXN_1.30-B_1.3_C01 (01035-01A) |
| SW Version | Logger SW V1.39 |
Download Instructions
Default settings seem to work, the transfer speed does not seem to have an effect.
Conversion Instructions
The log format type is special and known by BT747 as 'Holux GR-245'. To make sure that conversion works in all cases, you have to set the correct device type on the far right of the convert button in the BT747 Desktop Application (or elsewhere in the other GUI's).
If you fail to set the correct device type, conversion may sometimes work because BT747 was able to detect hints of the device format in the device's log.
